Simulated Sense of Sight
aurellem ☉
1 JMonkeyEngine natively supports multiple views of the same world.
Vision is one of the most important senses for humans, so I need to build a simulated sense of vision for my AI. I will do this with simulated eyes. Each eye can be independently moved and should see its own version of the world depending on where it is.
Making these simulated eyes a reality is simple because jMonkeyEngine already contains extensive support for multiple views of the same 3D simulated world. The reason jMonkeyEngine has this support is because the support is necessary to create games with split-screen views. Multiple views are also used to create efficient pseudo-reflections by rendering the scene from a certain perspective and then projecting it back onto a surface in the 3D world.
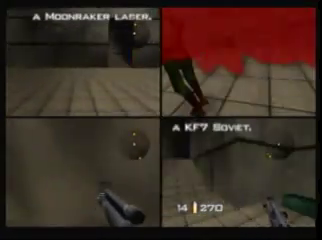
Figure 1: jMonkeyEngine supports multiple views to enable split-screen games, like GoldenEye, which was one of the first games to use split-screen views.
1.1 ViewPorts, SceneProcessors, and the RenderManager.
jMonkeyEngine allows you to create a ViewPort, which represents a
view of the simulated world. You can create as many of these as you
want. Every frame, the RenderManager iterates through each
ViewPort, rendering the scene in the GPU. For each ViewPort there
is a FrameBuffer which represents the rendered image in the GPU.
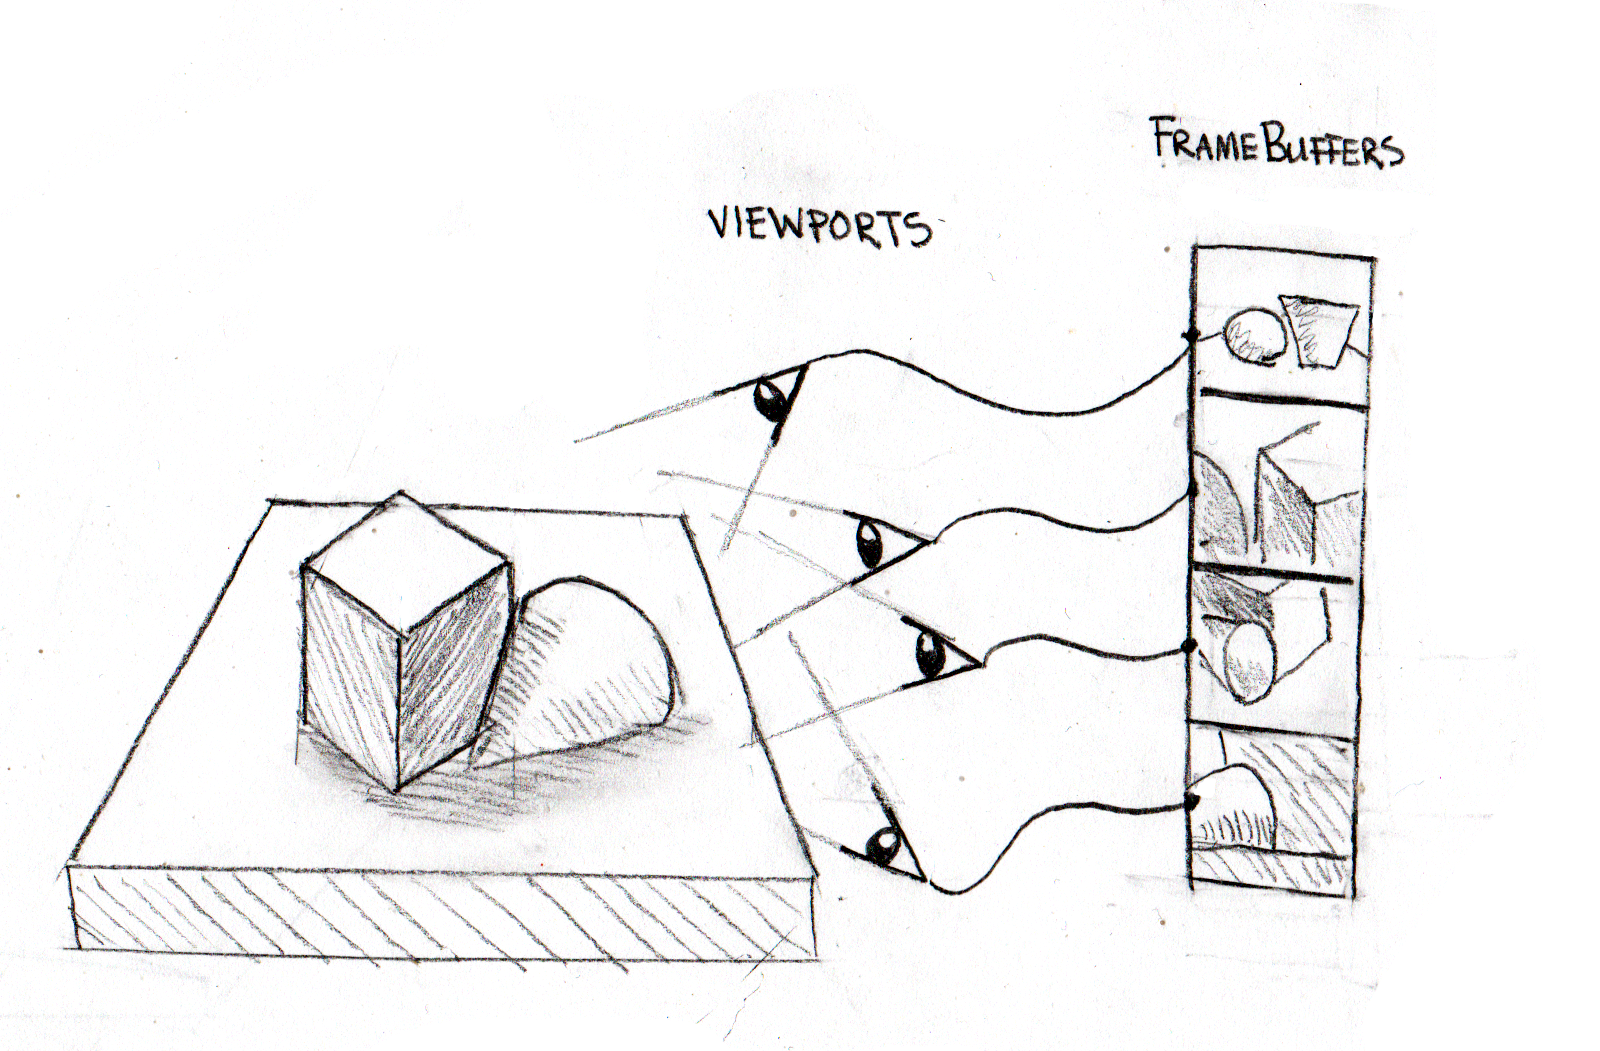
Figure 2: ViewPorts are cameras in the world. During each frame, the RenderManager records a snapshot of what each view is currently seeing; these snapshots are FrameBuffer objects.
Each ViewPort can have any number of attached SceneProcessor
objects, which are called every time a new frame is rendered. A
SceneProcessor receives its ViewPort's FrameBuffer and can do
whatever it wants to the data. Often this consists of invoking GPU
specific operations on the rendered image. The SceneProcessor can
also copy the GPU image data to RAM and process it with the CPU.
1.2 From Views to Vision
Each eye in the simulated creature needs its own ViewPort so that
it can see the world from its own perspective. To this ViewPort, I
add a SceneProcessor that feeds the visual data to any arbitrary
continuation function for further processing. That continuation
function may perform both CPU and GPU operations on the data. To make
this easy for the continuation function, the SceneProcessor
maintains appropriately sized buffers in RAM to hold the data. It does
not do any copying from the GPU to the CPU itself because it is a slow
operation.
(defn vision-pipeline
  "Create a SceneProcessor object which wraps a vision processing
  continuation function. The continuation is a function that takes
  [#^Renderer r #^FrameBuffer fb #^ByteBuffer b #^BufferedImage bi],
  each of which has already been appropriately sized."
  [continuation]
  (let [byte-buffer (atom nil)
        renderer (atom nil)
        image (atom nil)]
  (proxy [SceneProcessor] []
    (initialize
     [renderManager viewPort]
     (let [cam (.getCamera viewPort)
           width (.getWidth cam)
           height (.getHeight cam)]
       (reset! renderer (.getRenderer renderManager))
       (reset! byte-buffer
             (BufferUtils/createByteBuffer
              (* width height 4)))
        (reset! image (BufferedImage.
                      width height
                      BufferedImage/TYPE_4BYTE_ABGR))))
    (isInitialized [] (not (nil? @byte-buffer)))
    (reshape [_ _ _])
    (preFrame [_])
    (postQueue [_])
    (postFrame
     [#^FrameBuffer fb]
     (.clear @byte-buffer)
     (continuation @renderer fb @byte-buffer @image))
    (cleanup []))))
The continuation function given to vision-pipeline above will be
given a Renderer and three containers for image data. The
FrameBuffer references the GPU image data, but the pixel data can
not be used directly on the CPU. The ByteBuffer and BufferedImage
are initially "empty" but are sized to hold the data in the
FrameBuffer. I call transferring the GPU image data to the CPU
structures "mixing" the image data. I have provided three functions to
do this mixing.
(defn frameBuffer->byteBuffer!
  "Transfer the data in the graphics card (Renderer, FrameBuffer) to
   the CPU (ByteBuffer)."
  [#^Renderer r #^FrameBuffer fb #^ByteBuffer bb]
  (.readFrameBuffer r fb bb) bb)

(defn byteBuffer->bufferedImage!
  "Convert the C-style BGRA image data in the ByteBuffer bb to the AWT
   style ABGR image data and place it in BufferedImage bi."
  [#^ByteBuffer bb #^BufferedImage bi]
  (Screenshots/convertScreenShot bb bi) bi)

(defn BufferedImage!
  "Continuation which will grab the buffered image from the materials
   provided by (vision-pipeline)."
  [#^Renderer r #^FrameBuffer fb #^ByteBuffer bb #^BufferedImage bi]
  (byteBuffer->bufferedImage!
   (frameBuffer->byteBuffer! r fb bb) bi))
Note that it is possible to write vision processing algorithms
entirely in terms of BufferedImage inputs. Just compose that
BufferedImage algorithm with BufferedImage!. However, a vision
processing algorithm that is entirely hosted on the GPU does not have
to pay for this convenience.
2 Optical sensor arrays are described with images and referenced with metadata
The vision pipeline described above handles the flow of rendered images. Now, we need simulated eyes to serve as the source of these images.
An eye is described in blender in the same way as a joint. They are
zero dimensional empty objects with no geometry whose local coordinate
system determines the orientation of the resulting eye. All eyes are
children of a parent node named "eyes" just as all joints have a
parent named "joints". An eye binds to the nearest physical object
with bind-sense.
(in-ns 'cortex.vision)

(defn add-eye!
  "Create a Camera centered on the current position of 'eye which
   follows the closest physical node in 'creature. The camera will
   point in the X direction and use the Z vector as up as determined
   by the rotation of these vectors in blender coordinate space. Use
   XZY rotation for the node in blender."
  [#^Node creature #^Spatial eye]
  (let [target (closest-node creature eye)
        [cam-width cam-height]
        ;;[640 480] ;; graphics card on laptop doesn't support
                    ;; arbitray dimensions.
        (eye-dimensions eye)
        cam (Camera. cam-width cam-height)
        rot (.getWorldRotation eye)]
    (.setLocation cam (.getWorldTranslation eye))
    (.lookAtDirection
     cam                           ; this part is not a mistake and
     (.mult rot Vector3f/UNIT_X)   ; is consistent with using Z in
     (.mult rot Vector3f/UNIT_Y))  ; blender as the UP vector.
    (.setFrustumPerspective
     cam (float 45)
     (float (/ (.getWidth cam) (.getHeight cam)))
     (float 1)
     (float 1000))
    (bind-sense target cam) cam))
Here, the camera is created based on metadata on the eye-node and
attached to the nearest physical object with bind-sense
2.1 The Retina
An eye is a surface (the retina) which contains many discrete sensors to detect light. These sensors can have different light-sensing properties. In humans, each discrete sensor is sensitive to red, blue, green, or gray. These different types of sensors can have different spatial distributions along the retina. In humans, there is a fovea in the center of the retina which has a very high density of color sensors, and a blind spot which has no sensors at all. Sensor density decreases in proportion to distance from the fovea.
I want to be able to model any retinal configuration, so my eye-nodes in blender contain metadata pointing to images that describe the precise position of the individual sensors using white pixels. The meta-data also describes the precise sensitivity to light that the sensors described in the image have. An eye can contain any number of these images. For example, the metadata for an eye might look like this:
{0xFF0000 "Models/test-creature/retina-small.png"}
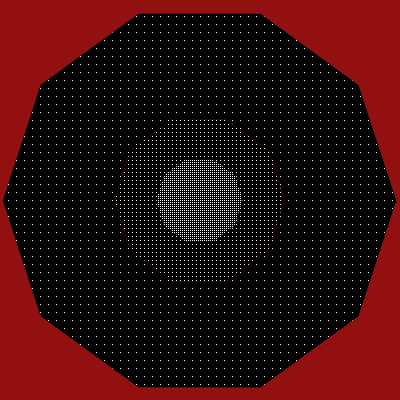
Figure 3: The retinal profile image "Models/test-creature/retina-small.png". White pixels are photo-sensitive elements. The distribution of white pixels is denser in the middle and falls off at the edges and is inspired by the human retina.
Together, the number 0xFF0000 and the image image above describe the placement of red-sensitive sensory elements.
Meta-data to very crudely approximate a human eye might be something like this:
(let [retinal-profile "Models/test-creature/retina-small.png"]
  {0xFF0000 retinal-profile
   0x00FF00 retinal-profile
   0x0000FF retinal-profile
   0xFFFFFF retinal-profile})
The numbers that serve as keys in the map determine a sensor's
relative sensitivity to the channels red, green, and blue. These
sensitivity values are packed into an integer in the order |_|R|G|B|
in 8-bit fields. The RGB values of a pixel in the image are added
together with these sensitivities as linear weights. Therefore,
0xFF0000 means sensitive to red only while 0xFFFFFF means sensitive to
all colors equally (gray).
For convenience I've defined a few symbols for the more common sensitivity values.
(def sensitivity-presets
  "Retinal sensitivity presets for sensors that extract one channel
   (:red :blue :green) or average all channels (:all)"
  {:all    0xFFFFFF
   :red    0xFF0000
   :blue   0x0000FF
   :green  0x00FF00})
2.2 Metadata Processing
retina-sensor-profile extracts a map from the eye-node in the same
format as the example maps above. eye-dimensions finds the
dimensions of the smallest image required to contain all the retinal
sensor maps.
(defn retina-sensor-profile
  "Return a map of pixel sensitivity numbers to BufferedImages
   describing the distribution of light-sensitive components of this
   eye. :red, :green, :blue, :gray are already defined as extracting
   the red, green, blue, and average components respectively."
   [#^Spatial eye]
   (if-let [eye-map (meta-data eye "eye")]
     (map-vals
      load-image
      (eval (read-string eye-map)))))

(defn eye-dimensions
  "Returns [width, height] determined by the metadata of the eye."
  [#^Spatial eye]
  (let [dimensions
          (map #(vector (.getWidth %) (.getHeight %))
               (vals (retina-sensor-profile eye)))]
    [(apply max (map first dimensions))
     (apply max (map second dimensions))]))
3 Importing and parsing descriptions of eyes.
First off, get the children of the "eyes" empty node to find all the eyes the creature has.
(def
  ^{:doc "Return the children of the creature's \"eyes\" node."
    :arglists '([creature])}
  eyes
  (sense-nodes "eyes"))
Then, add the camera created by add-eye! to the simulation by
creating a new viewport.
(in-ns 'cortex.vision)
(defn add-camera!
  "Add a camera to the world, calling continuation on every frame
  produced."
  [#^Application world camera continuation]
  (let [width (.getWidth camera)
        height (.getHeight camera)
        render-manager (.getRenderManager world)
        viewport (.createMainView render-manager "eye-view" camera)]
    (doto viewport
      (.setClearFlags true true true)
      (.setBackgroundColor ColorRGBA/Black)
      (.addProcessor (vision-pipeline continuation))
      (.attachScene (.getRootNode world)))))
The eye's continuation function should register the viewport with the
simulation the first time it is called, use the CPU to extract the
appropriate pixels from the rendered image and weight them by each
sensor's sensitivity. I have the option to do this processing in
native code for a slight gain in speed. I could also do it in the GPU
for a massive gain in speed. vision-kernel generates a list of
such continuation functions, one for each channel of the eye.
(in-ns 'cortex.vision)

(defrecord attached-viewport [vision-fn viewport-fn]
  clojure.lang.IFn
  (invoke [this world] (vision-fn world))
  (applyTo [this args] (apply vision-fn args)))

(defn pixel-sense [sensitivity pixel]
  (let [s-r (bit-shift-right (bit-and 0xFF0000 sensitivity) 16)
        s-g (bit-shift-right (bit-and 0x00FF00 sensitivity)  8)
        s-b (bit-and 0x0000FF sensitivity)

        p-r (bit-shift-right (bit-and 0xFF0000 pixel)       16)
        p-g (bit-shift-right (bit-and 0x00FF00 pixel)        8)
        p-b (bit-and 0x0000FF pixel)

        total-sensitivity (* 255 (+ s-r s-g s-b))]
        (float (/ (+ (* s-r p-r)
                     (* s-g p-g)
                     (* s-b p-b))
                  total-sensitivity))))

(defn vision-kernel
  "Returns a list of functions, each of which will return a color
   channel's worth of visual information when called inside a running
   simulation."
  [#^Node creature #^Spatial eye & {skip :skip :or {skip 0}}]
  (let [retinal-map (retina-sensor-profile eye)
        camera (add-eye! creature eye)
        vision-image
        (atom
         (BufferedImage. (.getWidth camera)
                         (.getHeight camera)
                         BufferedImage/TYPE_BYTE_BINARY))
        register-eye!
        (runonce
         (fn [world]
           (add-camera!
            world camera
            (let [counter  (atom 0)]
              (fn [r fb bb bi]
                (if (zero? (rem (swap! counter inc) (inc skip)))
                  (reset! vision-image
                          (BufferedImage! r fb bb bi))))))))]
     (vec
      (map
       (fn [[key image]]
         (let [whites (white-coordinates image)
               topology (vec (collapse whites))
               sensitivity (sensitivity-presets key key)]
           (attached-viewport.
            (fn [world]
              (register-eye! world)
              (vector
               topology
               (vec
                (for [[x y] whites]
                  (pixel-sense
                   sensitivity
                   (.getRGB @vision-image x y))))))
            register-eye!)))
         retinal-map))))

(defn gen-fix-display
  "Create a function to call to restore a simulation's display when it
   is disrupted by a Viewport."
  []
  (runonce
   (fn [world]
     (add-camera! world (.getCamera world) no-op))))
Note that since each of the functions generated by vision-kernel
shares the same register-eye! function, the eye will be registered
only once the first time any of the functions from the list returned
by vision-kernel is called. Each of the functions returned by
vision-kernel also allows access to the Viewport through which
it receives images.
The in-game display can be disrupted by all the ViewPorts that the
functions generated by vision-kernel add. This doesn't affect the
simulation or the simulated senses, but can be annoying.
gen-fix-display restores the in-simulation display.
3.1 The vision! function creates sensory probes.
All the hard work has been done; all that remains is to apply
vision-kernel to each eye in the creature and gather the results
into one list of functions.
(defn vision!
  "Returns a list of functions, each of which returns visual sensory
   data when called inside a running simulation."
  [#^Node creature & {skip :skip :or {skip 0}}]
  (reduce
   concat
   (for [eye (eyes creature)]
     (vision-kernel creature eye))))
3.2 Displaying visual data for debugging.
It's vital to have a visual representation for each sense. Here I use
view-sense to construct a function that will create a display for
visual data.
(in-ns 'cortex.vision)

(defn view-vision
  "Creates a function which accepts a list of visual sensor-data and
  displays each element of the list to the screen."
  []
  (view-sense
   (fn
     [[coords sensor-data]]
     (let [image (points->image coords)]
       (dorun
        (for [i (range (count coords))]
          (.setRGB image ((coords i) 0) ((coords i) 1)
                   (gray (int (* 255 (sensor-data i)))))))
       image))))
4 Demonstrations
4.1 Demonstrating the vision pipeline.
This is a basic test for the vision system. It only tests the vision-pipeline and does not deal with loading eyes from a blender file. The code creates two videos of the same rotating cube from different angles.
(in-ns 'cortex.test.vision)

(defn test-pipeline
  "Testing vision:
   Tests the vision system by creating two views of the same rotating
   object from different angles and displaying both of those views in
   JFrames.

   You should see a rotating cube, and two windows,
   each displaying a different view of the cube."
  ([] (test-pipeline false))
  ([record?]
     (let [candy
           (box 1 1 1 :physical? false :color ColorRGBA/Blue)]
       (world
        (doto (Node.)
          (.attachChild candy))
        {}
        (fn [world]
          (let [cam (.clone (.getCamera world))
                width (.getWidth cam)
                height (.getHeight cam)]
            (add-camera! world cam
                         (comp
                          (view-image
                           (if record?
                             (File. "/home/r/proj/cortex/render/vision/1")))
                          BufferedImage!))
            (add-camera! world
                         (doto (.clone cam)
                           (.setLocation (Vector3f. -10 0 0))
                           (.lookAt Vector3f/ZERO Vector3f/UNIT_Y))
                         (comp
                          (view-image
                           (if record?
                             (File. "/home/r/proj/cortex/render/vision/2")))
                          BufferedImage!))
            (let [timer (IsoTimer. 60)]
              (.setTimer world timer)
              (display-dilated-time world timer))
            ;; This is here to restore the main view
            ;; after the other views have completed processing
            (add-camera! world (.getCamera world) no-op)))
        (fn [world tpf]
          (.rotate candy (* tpf 0.2) 0 0))))))
Creating multiple eyes like this can be used for stereoscopic vision simulation in a single creature or for simulating multiple creatures, each with their own sense of vision.
4.2 Demonstrating eye import and parsing.
To the worm from the last post, I add a new node that describes its eyes.
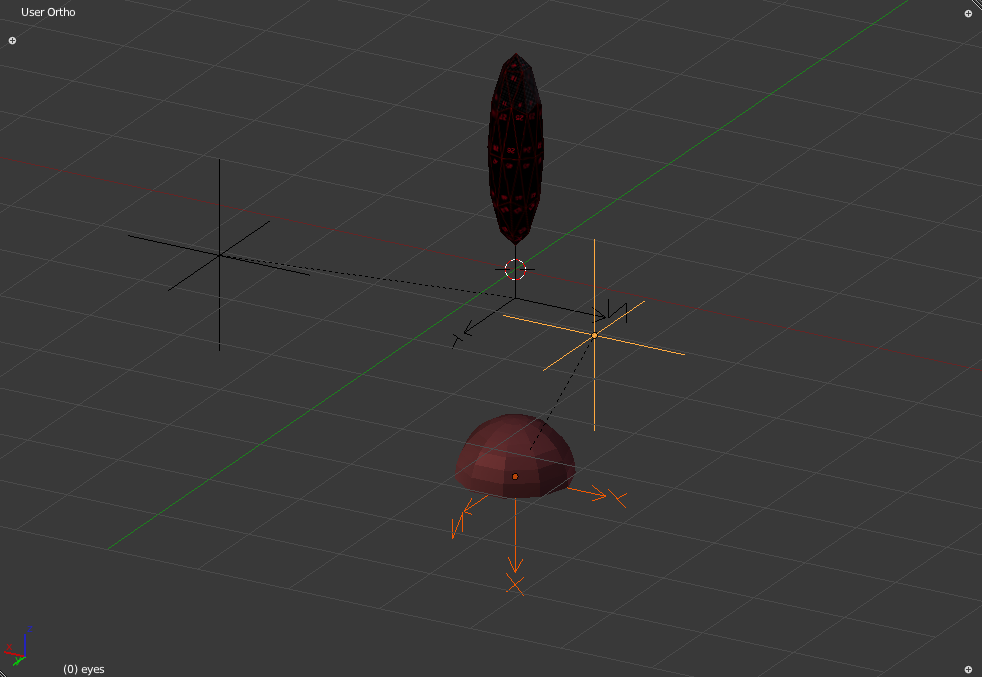
Figure 4: The worm with newly added empty nodes describing a single eye.
The node highlighted in yellow is the root level "eyes" node. It has a single child, highlighted in orange, which describes a single eye. This is the "eye" node. It is placed so that the worm will have an eye located in the center of the flat portion of its lower hemispherical section.
The two nodes which are not highlighted describe the single joint of the worm.
The metadata of the eye-node is:
(cortex.sense/meta-data
 (.getChild (.getChild (cortex.test.body/worm) "eyes") "eye") "eye")
"(let [retina \"Models/test-creature/retina-small.png\"]
    {:all retina :red retina :green retina :blue retina})"
This is the approximation to the human eye described earlier.
(in-ns 'cortex.test.vision)

(defn change-color [obj color]
  ;;(println-repl obj)
  (if obj
    (.setColor  (.getMaterial obj) "Color" color)))

(defn colored-cannon-ball [color]
  (comp #(change-color % color)
         (fire-cannon-ball)))

(defn gen-worm
  "create a creature acceptable for testing as a replacement for the
   worm."
  []
  (nodify
   "worm"
   [(nodify
     "eyes"
     [(doto
          (Node. "eye1")
        (.setLocalTranslation (Vector3f. 0 -1.1 0))
        (.setUserData

         "eye"
         "(let [retina
                \"Models/test-creature/retina-small.png\"]
                {:all retina :red retina
                 :green retina :blue retina})"))])
    (box
     0.2 0.2 0.2
     :name "worm-segment"
     :position (Vector3f. 0 0 0)
     :color ColorRGBA/Orange)]))


(defn test-worm-vision
  "Testing vision:
   You should see the worm suspended in mid-air, looking down at a
   table. There are four small displays, one each for red, green blue,
   and gray channels. You can fire balls of various colors, and the
   four channels should react accordingly.

   Keys:
     r  : fire red-ball
     b  : fire blue-ball
     g  : fire green-ball
     <space> : fire white ball"

  ([] (test-worm-vision false))
  ([record?]
     (let [the-worm (doto (worm)(body!))
           vision (vision! the-worm)
           vision-display (view-vision)
           fix-display (gen-fix-display)
           me (sphere 0.5 :color ColorRGBA/Blue :physical? false)
           x-axis
           (box 1 0.01 0.01 :physical? false :color ColorRGBA/Red
                :position (Vector3f. 0 -5 0))
           y-axis
           (box 0.01 1 0.01 :physical? false :color ColorRGBA/Green
                :position (Vector3f. 0 -5 0))
           z-axis
           (box 0.01 0.01 1 :physical? false :color ColorRGBA/Blue
                :position (Vector3f. 0 -5 0))

           ]

       (world
        (nodify [(floor) the-worm x-axis y-axis z-axis me])
        (merge standard-debug-controls
               {"key-r" (colored-cannon-ball ColorRGBA/Red)
                "key-b" (colored-cannon-ball ColorRGBA/Blue)
                "key-g" (colored-cannon-ball ColorRGBA/Green)})

        (fn [world]
          (light-up-everything world)
          (speed-up world)
          (let [timer (IsoTimer. 60)]
                (.setTimer world timer)
                (display-dilated-time world timer))
          ;; add a view from the worm's perspective
          (if record?
            (Capture/captureVideo
             world
             (File.
              "/home/r/proj/cortex/render/worm-vision/main-view")))

          (add-camera!
           world
           (add-eye! the-worm (first (eyes the-worm)))
           (comp
            (view-image
             (if record?
               (File.
                "/home/r/proj/cortex/render/worm-vision/worm-view")))
            BufferedImage!))

          (set-gravity world Vector3f/ZERO)
          (add-camera! world (.getCamera world) no-op))

        (fn [world _]
          (.setLocalTranslation me (.getLocation (.getCamera world)))
           (vision-display
            (map #(% world) vision)
            (if record?
              (File. "/home/r/proj/cortex/render/worm-vision")))
          (fix-display world)
          )))))
The world consists of the worm and a flat gray floor. I can shoot red, green, blue and white cannonballs at the worm. The worm is initially looking down at the floor, and there is no gravity. My perspective (the Main View), the worm's perspective (Worm View) and the 4 sensor channels that comprise the worm's eye are all saved frame-by-frame to disk.
5 Demonstration of Vision
5.1 Generate the Worm Video from Frames
(ns cortex.video.magick2
  (:import java.io.File)
  (:use clojure.java.shell))

(defn images [path]
  (sort (rest (file-seq (File. path)))))

(def base "/home/r/proj/cortex/render/worm-vision/")

(defn pics [file]
  (images (str base file)))

(defn combine-images []
  (let [main-view (pics "main-view")
        worm-view (pics "worm-view")
        blue   (pics "0")
        green  (pics "1")
        red    (pics "2")
        gray   (pics "3")
        blender (let [b-pics (pics "blender")]
                  (concat b-pics (repeat 9001 (last b-pics))))
        background (repeat 9001 (File. (str base "background.png")))
        targets (map
                 #(File. (str base "out/" (format "%07d.png" %)))
                 (range 0 (count main-view)))]
    (dorun
     (pmap
      (comp
       (fn [[background main-view worm-view red green blue gray blender target]]
         (println target)
         (sh "convert"
             background
             main-view "-geometry" "+18+17"    "-composite"
             worm-view "-geometry" "+677+17"   "-composite"
             green     "-geometry" "+685+430"  "-composite"
             red       "-geometry" "+788+430"  "-composite"
             blue      "-geometry" "+894+430"  "-composite"
             gray      "-geometry" "+1000+430" "-composite"
             blender   "-geometry" "+0+0"      "-composite"
             target))
       (fn [& args] (map #(.getCanonicalPath %) args)))
      background main-view worm-view red green blue gray blender targets))))
cd /home/r/proj/cortex/render/worm-vision
ffmpeg -r 25 -b 9001k -i out/%07d.png -vcodec libtheora worm-vision.ogg
6 Onward!
- As a neat bonus, this idea behind simulated vision also enables one to capture live video feeds from jMonkeyEngine.
- Now that we have vision, it's time to tackle hearing.
#+appendix
7 Headers
(ns cortex.vision
  "Simulate the sense of vision in jMonkeyEngine3. Enables multiple
  eyes from different positions to observe the same world, and pass
  the observed data to any arbitrary function. Automatically reads
  eye-nodes from specially prepared blender files and instantiates
  them in the world as actual eyes."
  {:author "Robert McIntyre"}
  (:use (cortex world sense util))
  (:import com.jme3.post.SceneProcessor)
  (:import (com.jme3.util BufferUtils Screenshots))
  (:import java.nio.ByteBuffer)
  (:import java.awt.image.BufferedImage)
  (:import (com.jme3.renderer ViewPort Camera))
  (:import (com.jme3.math ColorRGBA Vector3f Matrix3f))
  (:import com.jme3.renderer.Renderer)
  (:import com.jme3.app.Application)
  (:import com.jme3.texture.FrameBuffer)
  (:import (com.jme3.scene Node Spatial)))
(ns cortex.test.vision
  (:use (cortex world sense util body vision))
  (:use cortex.test.body)
  (:import java.awt.image.BufferedImage)
  (:import javax.swing.JPanel)
  (:import javax.swing.SwingUtilities)
  (:import java.awt.Dimension)
  (:import javax.swing.JFrame)
  (:import com.jme3.math.ColorRGBA)
  (:import com.jme3.scene.Node)
  (:import com.jme3.math.Vector3f)
  (:import java.io.File)
  (:import (com.aurellem.capture Capture RatchetTimer IsoTimer)))
8 Source Listing
9 Next
I find some ears for the creature while exploring the guts of jMonkeyEngine's sound system.